Workspaces
Workspaces is a unified support delivery solution and remote monitoring and management (RMM), where various tools for device management and automation and user interaction converge. Access to the module is segmented by levels, ensuring the provision of appropriate tools to each technical or support team through role assignment.
Workspaces is ready to manage user sessions from any technology, because FlexxAgent can identify the type of virtualization and brokering used in each session.
Interface and Access Segmentation
The functionalities available in Workspaces are segmented into two levels, so access to them is granted through roles. Clicking on any level expands the menu options to access specific features.
Level 1
It gathers the tools for the teams that have the most direct contact with end users. Includes views for UX Panel, Workspaces, Sessions, Connection Logs, Jobs, Alerts, and Profile Storage.
Functionalities available at this level:
Level 2
Offers tools that enable a more detailed diagnosis, such as monitoring, event log filtering, server management, and more. Functionalities available at this level:
List Views
From the list views, you can filter and select items in the Workspaces and Sessions sections to get lists of, for example, devices with a certain uptime, with pending restarts for updates, or those that haven't been used for a specific period, among others.
Based on filter results, specific tasks can be performed on devices or sessions, such as executing microservices, power actions, remote user assistance, and more.
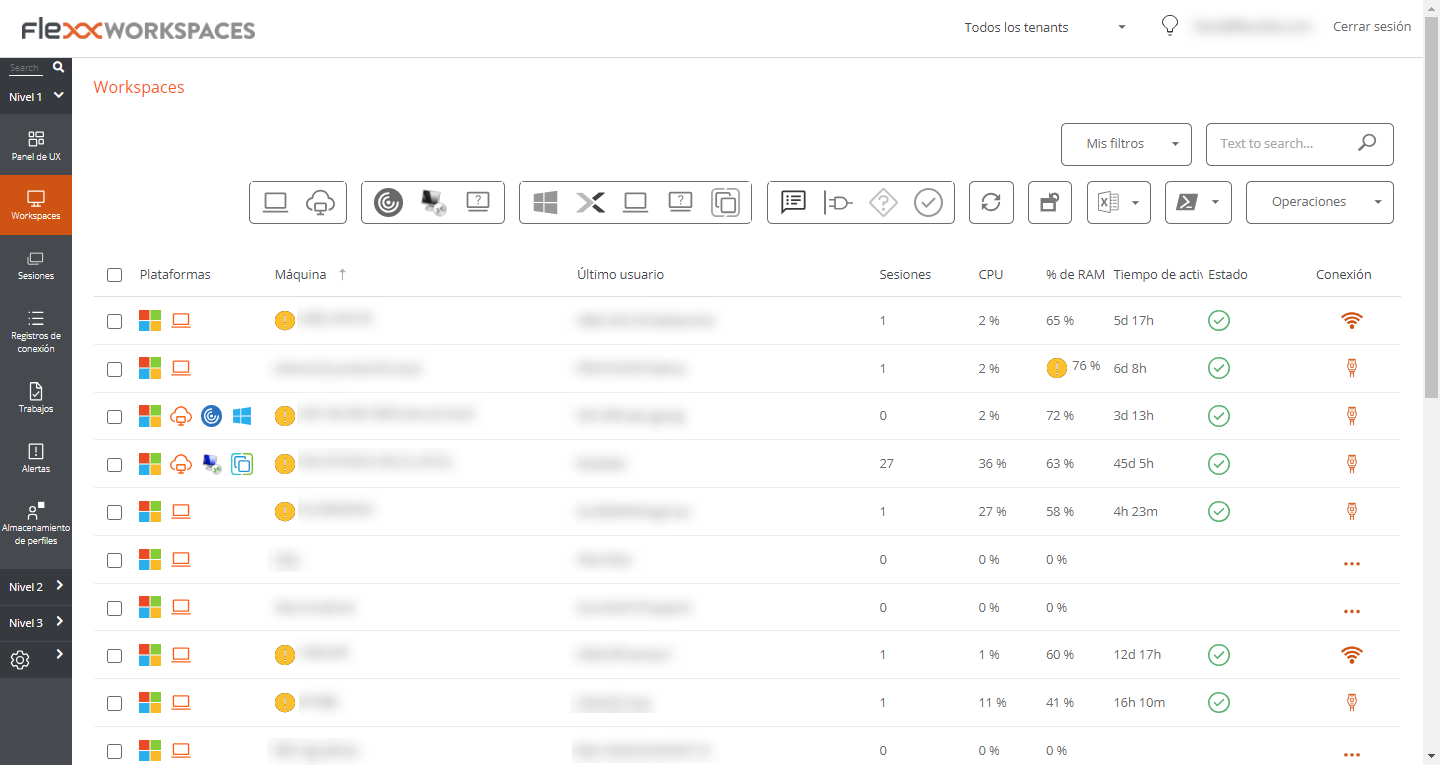
In addition to filtering, list views also offer other options, such as exporting the listings and saving the applied filters as user filters.
Filtering Options
To access the grouping and filtering options of the item list, right-click on the header of a column. Below, options will be shown according to the sorting, grouping, visibility, and filtering of the columns.
Column sorting
The options Sort Ascending and Sort Descending allow you to arrange the values of a column according to the letter or number they start with. For example, if the column % RAM is set to sort ascending, the column values will be arranged so that the first row corresponds to the device with the lowest percentage of RAM used and the last row with the highest percentage. Or if the column Status is set to sort descending, the first row will correspond to the device whose status is Not reporting and the last row will correspond to the device whose status is Off.
To reset the column sorting, click on Clear sorting.
Grouping by Column
The options Group by this column and Group panel allow creating a group of records for each value of the selected column field.
The difference between them is that Group by this column only considers the selected column for grouping the records, while Group panel allows selecting more than one column for grouping.
Column visibility
The options Hide column, Show customization dialog, and Column selector allow modifying the column visibility in the table.
If the user doesn't want to see a specific column, they need to go to its header, right-click, and select the Hide column option. If they want to configure in detail the columns and records they want to see in the table, they should click Show customization dialog, but if they prefer to add or remove columns, they can do so through the Column selector.
Value filtering
The options Filter editor and Filter row allow setting filters according to the values of the column fields. If a user wants to build filters by multiple criteria (inclusive and exclusive), analyze the content of fields, and nest queries, they should click on Filter editor. A user can also filter the field values based on the list shown by the table, to do this they should select the Filter row option.
When the Footer option is selected, the total number of records found is displayed at the bottom left of the table.
Detail Views
By clicking on an item in the table, you can access detailed information. The data is organized into inventory blocks and tabs that facilitate navigation.